Are you thinking about changing your WordPress theme? Giving your site a face-lift can be a great way to inject vitality into a site that’s grown dull and stale.
But it can be scary too. What if something breaks, and you don’t know how to recover everything you worked so hard to build?
There’s no need to worry. Today we’ll look at how to change your WordPress theme without breaking your site. That way, you’ll have a great new look, without the worry of things going wrong.
Before you start, here’s a quick summary of what you’ll learn:
- What to do Before Changing Your WordPress Theme.
- How to Install your WordPress Theme.
- How to Change Themes Before Going Live.
- How to Change Themes on a Live Site.
- Things to do After Changing WordPress Themes.
What to Do Before Changing Your WordPress Theme
Learning how to change your WordPress theme is no small task. While your new, shiny theme might be a few clicks away, there’s still plenty to take care of before making the switch.
Work through this checklist before changing your theme. That way, everything should go smoothly with less chance you’ll break your site.
1. Copy and Save Custom Code Snippets
If you’ve been using the same WordPress theme for a while, you may have customized certain areas of the theme with your own code.
These changes are easy to overlook once they’ve been made.
If you, or your web developer have changed your theme’s code in the past, it’s important to go through the theme files, and note them down. That way, you can add them to your new theme at a later time.
Not doing so will mean your new theme won’t have those custom changes, because the new theme replaces all the old theme files.
That’s why if you want to add code snippets to your site, we recommend creating a site-specific plugin instead of editing your theme files directly. That way, any code you add won’t be affected if you switch themes.
2. Check Your Load Times
One of the next things to do before changing your theme is to check the loading time of your website. This makes it easy to compare your old theme speed with the new one.
The speed of your WordPress site is an important factor for SEO, and the browsing experience of your site visitors. Having a new theme that’s slower than your previous one could make your visitor’s experience worse, as well as your search rankings.
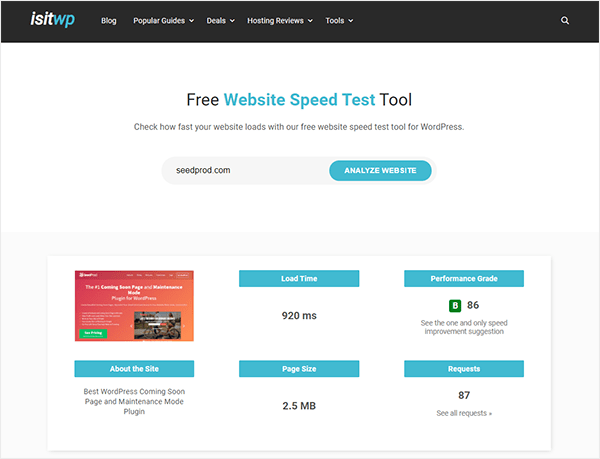
You can use this free WordPress speed test tool to check your website speed. Make sure you check some of your inner pages, as well as your homepage, for a better idea of overall performance.
3. Save Your Tracking Codes
When it comes to your tracking codes for analytics, some people add these directly into their theme files. Many themes also have a special theme options area for saving tracking codes.
Before changing your WordPress theme, copy and paste these codes into a notepad. When you’ve switched theme you can add them back in.
To save yourself the hassle of having to do this every time, we recommend using a plugin like MonsterInsights for installing Google Analytics. And, for any other tracking code, the header and footer plugin is another good choice.
The tracking code in these plugins won’t be affected if you change themes, so you won’t risk losing data.
4. Backup Your Website
It’s always a smart choice to backup your site before changing themes. Make sure you back up your:
- Posts
- Pages
- Images
- Plugins, and
- Database
This is so that if your new theme causes any issues, you have a full backup to restore your website.
A good way to do this is to use a WordPress backup plugin to backup your entire site.
Make sure you download your backup to your computer before moving forward with installing your new theme. Your backup is then easily accessible should things go wrong.
5. Save Your Sidebar Content
Sidebars are a great place to display important information such as:
But, they’re easily overlooked when changing your WordPress theme. While WordPress will save your widgets, the layout may change depending on your theme.
That’s why it’s a good idea to make a note of your sidebar layout before switching, including any custom HTML and advertising codes. Then save them to your computer.
Once you’ve switched to your new theme you can easily add your code back in if needed, and make sure your widgets are displaying as they were before.
6. Enable Maintenance Mode
If you’re not using a staging site, it’s always worth getting into the habit of putting your site into maintenance mode when making changes behind the scenes. You don’t want visitors seeing a site that’s clearly under construction.
We suggest using the SeedProd plugin for this purpose.
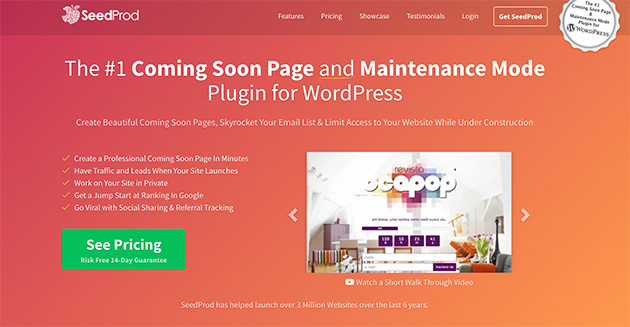
With SeedProd you can create stunning coming soon, and maintenance mode pages, without having to know any code.
To put your site into maintenance mode install and activate the SeedProd plugin.
Then go to the SeedProd » Settings page to set things up.
Click the Enable Maintenance Mode option, then Save All Changes.

Here’s a step by step tutorial on how to put your WordPress site into maintenance mode.
How to Install Your WordPress Theme
After working through the above steps to prevent breaking your site, the next step is to install your new theme.
Chances are you’ve already found a good theme. But, if you’re still undecided, we highly recommend the following WordPress themes and plugins:
1. Divi

Divi is a hugely popular WordPress Theme powered by the powerful drag and drop Divi Builder. It easily allows you to build any kind of website.
Divi comes with over 20 pre-built layouts and has 46 different elements for displaying your content. You can customize each element to suit your needs, and the changes can be seen in real-time.
2. Astra

Astra is a super lightweight theme that’s optimized for speed. It works with a number of popular page builder plugins like Beaver Builder, and Divi, so you can build your website in any way you prefer.
This theme is also a translation, and right-to-left (RTL) ready theme. This means your website can be any language you’d like. You can even go multilingual if your visitors use different languages.
Astra is easy to integrate with the WooCommerce plugin, meaning you can turn your site into an online store. What’s more, you can customize many elements using the WordPress Theme Customizer.
3. StudioPress

Genesis is one of the most popular theme frameworks for WordPress, and was built by the StudioPress team. Alongside their minimalist child themes, you can create stunning websites using Genesis.
StudioPress is also part of WP Engine, the most popular managed WordPress hosting company. And, if you sign up for a WP Engine hosting plan, you’ll get over 35 StudioPress themes for free.
4. OceanWP

OceanWP is a WordPress theme that’s both responsive, and multi-purpose. It has a large selection of demo templates built with a variety of businesses, and professions in mind.
What’s more, it’s compatible with major page builder plugins. Add to this, a range of extensions and you can take your site even further.
5. Beaver Builder

An excellent drag and drop page builder, Beaver Builder is a plugin that you can use to customize any theme. It lets you build gorgeous pages for your site without the need to know any coding.
Beaver Builder works with almost any WordPress theme without breaking your site. You can even use it to build your own custom theme without having to take a course on learning to code. Its drag and drop builder makes the process effortless.
Hopefully, with these recommendations, you’ve managed to choose a theme that will work well for your website.
The next step is to add your theme to WordPress. You can do this in a few ways:
- Downloading your theme directly from the theme provider, and uploading it to your site.
- Searching for your theme using the WordPress theme search option.
For help getting set up, check out this beginner’s guide on installing a WordPress theme.
How to Change WordPress Theme Before Going Live
With your theme installed, it’s now time to switch over to your new look.
But before you go live, it’s important to test the new theme. This is so you can ensure it works well alongside your existing plugins, as well as iron out any compatibility issues.
Let’s take a look at 3 ways you can test your theme without making it live.
1. Use the Live Preview Option
WordPress has a nifty default option that lets you preview changes made to your site, without publishing them.
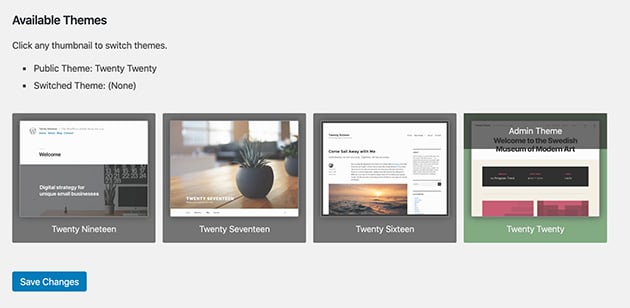
To do this go to Appearance » Themes from the left-hand sidebar of your admin panel. You’ll then see a list of your currently installed themes.
Hover your mouse cursor over the theme you want to preview then click the Live Preview button.
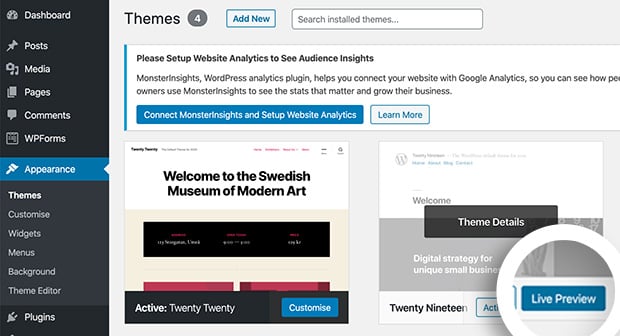
This opens your theme in the WordPress Theme Customizer.
Here you can test all areas of your site, and view them as if they were live, all without breaking your site, and committing to any changes.
2. Use the Theme Switcha Plugin
Another option for previewing, and testing your theme is to use the Theme Switcha Plugin. This lets you preview your new theme without going live with the changes.
First, download, install, and activate the free plugin. Then go to Settings » Theme Switcha from the left-hand sidebar of your admin panel.
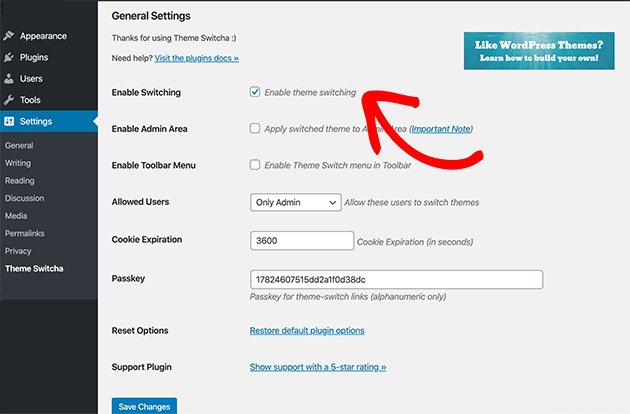
From the general settings page select the Enable Theme Switching option. Then scroll down to the bottom of the page and click Save Changes.
At the bottom of the page, the plugin will now display all your installed themes. Click your new theme to preview it in a new browser tab.
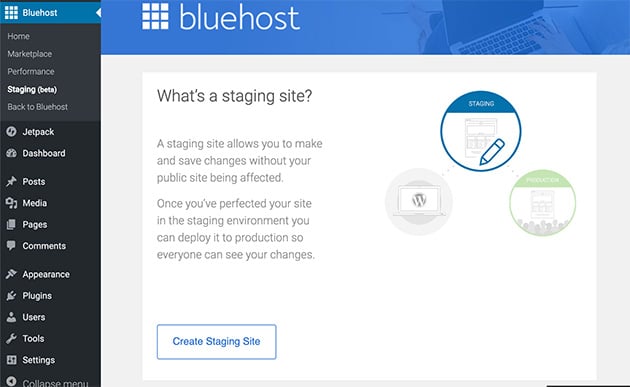
3. Clone Your Site to a Staging Environment
Many WordPress hosting companies now have the option to clone a copy of your website onto a special staging environment so you can test out changes before publishing them.
Here’s an example of creating a staging environment using Bluehost. From your admin panel select Bluehost » Staging. This will bring up a page that asks if you’d like to copy your production (live) site to a staging site.
Click Create Staging Site to begin making the clone.
After a short while, you’ll see a page with a success message, telling you your staging environment is ready to work on.
Click Go to Staging Site to go to this version of your website.
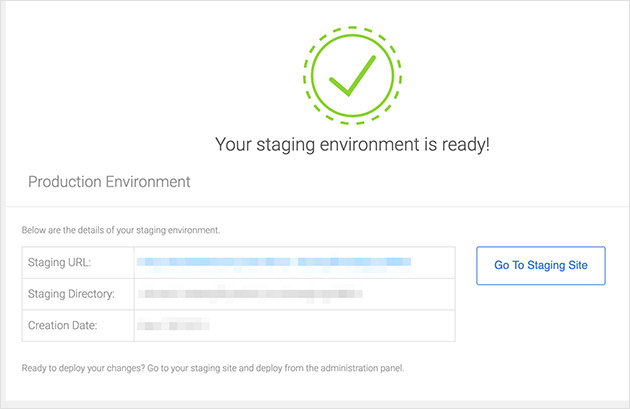
You can now test that your theme is working properly, without any changes affecting the original version of your site.
We’ll discuss how to publish the changes next.
How to Change WordPress Theme on a Live Site
Now that you’ve successfully tested your new theme, and ensured it works in a way that won’t break your site, you’re ready to make it live.
To publish your new theme, the easiest way is to go to Appearance » Themes from the left-hand sidebar of your admin panel. Now hover your mouse cursor over your chosen theme, and click the Activate button.
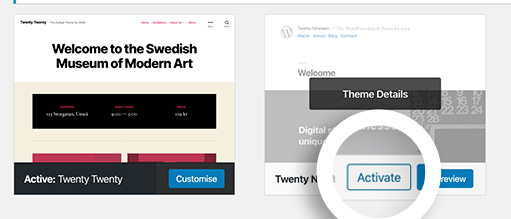
Now, if you head to your homepage, you’ll see your new WordPress theme in action.
To publish your new theme from a staging environment, as we showed you how to do above with Bluehost, follow these steps.
From your staging environment go to Bluehost » Staging Site, and scroll a little way down the page. You’ll see 3 options for copying your test site over to your original, live site.
- Deploy files only.
- Deploy files and database.
- Deploy database only.
In most cases, you should choose the Deploy Files and Database option, since it will include any and all changes you’ve made to your site.
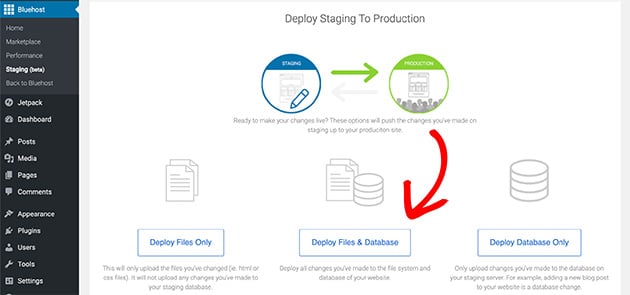
It may take a minute or 2 for the information to copy over. You’ll see a success message when the process is complete.
Once that’s done, navigate back to your main (production) site where your new theme will be in action.
Some people prefer using an older method of changing their WordPress theme by using File Transfer Protocol (FTP) to upload files to WordPress.
Check this beginner’s guide on using FTP to learn how.
What to Do After Changing Your WordPress Theme
It’s easy to think that after changing your WordPress theme, the work is over and you can sit back and relax. Truth is, there’s still a few things to handle to get the best experience for your site visitors.
Use the following checklist to ensure a smooth experience after changing your theme.
1. Check Your Website Works Properly
Even though you’ve tested your new WordPress theme before launching, it’s easy for a few glitches to make their way through.
Take some time to thoroughly check your:
- Plugins
- Widgets
- Posts
- Comment sections, and
- Forms
Ensure they’re working as they should, to prevent vital elements of your site from breaking.
2. Check Your Website in All Browsers
Next, check your website in different web browsers. Some browsers tend to display things differently than others.
Checking your site for cross-browser compatibility is important for consistency. An inconsistent experience for your site visitors can seem unprofessional.
3. Add Tracking Codes and Snippets
Remember the tracking codes and code snippets you saved before changing your WordPress theme? Well, now it’s time to add them back into your new theme.
MonsterInsights is a great choice for adding your Google Analytics tracking code. It lets you properly set up analytics, as well as allowing you to view important statistics from within your WordPress dashboard.
4. Disable Maintenance Mode
To allow your site visitors to see your new theme, you can go ahead and disable maintenance mode.
If you’re using the SeedProd plugin, go to SeedProd » Settings from the left-hand sidebar in your admin panel.
On the settings page, click Disabled to deactivate maintenance mode, and click Save All Changes.

5. Test Your Page Loading Times
Lastly, check the page loading times of your homepage, after changing your WordPress theme. Head back to the WordPress speed test tool and test the same pages as before.
Compare your old theme’s page speeds to those of your new one.
If you don’t see any improvements in your site speed, you can follow this simple guide to improve WordPress speed.
Great work! You now have a site that looks much better than it used to. You’ve also learned how to change your WordPress theme without breaking your site!
We hope you found this guide on changing themes super useful. And if you’d like to refresh your plugins as well as your theme, without breaking the bank, you might like this guide on the best free WordPress plugins.
If you enjoyed this article, then remember to follow us on Facebook and Twitter for more helpful WordPress guides.
The post How to Change Your WordPress Theme Without Breaking Your Site appeared first on SeedProd.