Do you want to increase conversions for your online store? Setting up WooCommerce conversion tracking in Google Analytics provides the insights you need to make changes that improve your conversion rates.
But how do you do it?
In this article, we’ll show you how to set up WooCommerce conversion tracking in Google Analytics.
Here are the steps for easy reference:
- Install the MonsterInsights Plugin
- Set Up Enhanced eCommerce Tracking in Google Analytics
- Enable Enhanced eCommerce Tracking in MonsterInsights
- View Conversion Tracking Reports in WordPress
- View WooCommerce Conversion Tracking Data in Google Analytics
Now, before we get started, let’s answer the following questions.
Why Set Up WooCommerce Conversion Tracking?
Setting up conversion tracking for your online store gives you insights into the behavior of your customers. That way, you can analyze their purchases and transactions and make better decisions to improve your store’s conversion rates.
When you enable conversion tracking in WooCommerce, you’ll have access to the following data:
- Key Performance Indicators (KPIs) – Key store metrics that tell you where your success comes from and the changes needed to increase sales. The KPIs you can track with Google Analytics include average order value, shopping cart abandonment, eCommerce conversion rates, and more.
- Shopping Behavior – Customer shopping habits, including your most popular products, how they navigate your store, and how many users abandon their carts.
- Checkout Behavior – Keep track of billing and shipping, payments, product reviews, and more.
- Product Performance – Track performance details on individual products and add category and brand properties to keep track of too.
- Sales Performance – Sales details, such as revenue, tax, shipping, and refunds.
- Product List Performance – Create website groups for upselling, cross-selling, product building, and more. Then track the revenue for each list.
You’re also able to track marketing efforts such as coupon codes and affiliate tracking so you can measure their effectiveness.
As you can see, WooCommerce conversion tracking gives you everything you need to improve your store so you can boost your revenue.
So how do you set up conversion tracking on your WordPress site? Let’s dive in!
How to Set Up WooCommerce Conversion Tracking (Step by Step)
There are plenty of WooCommerce conversion tracking plugins to choose from. Yet, most are challenging to set up and have limited settings. That isn’t helpful if you’re a beginner and don’t have analytics experience.
But don’t worry. We’ve found a much simpler solution.
The best and easiest way to set up conversion tracking for your WooCommerce store is to use the MonsterInsights plugin for WordPress.
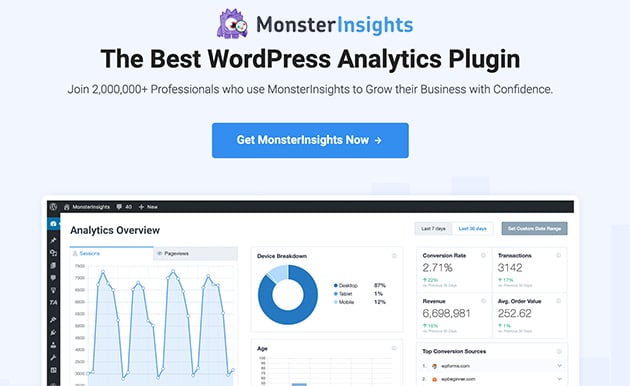
MonsterInsights is a complete Google Analytics plugin for WordPress. But with the eCommerce addon, you can turn on the Enhanced eCommerce setting in Google Analytics with a few clicks.
For you, that means no tracking codes to copy and no complicated configurations.
With that in mind, go ahead and follow the steps below to set up conversion tracking for your WooCommerce site.
Step 1: Install MonsterInsights Plugin and eCommerce Addon
The first step is to install the MonsterInsights plugin, then connect MonsterInsights to Google Analytics. That ensures your website and Google Analytics are communicating with each other.
Next, install the MonsterInsights eCommerce addon, which lets you enable eCommerce tracking for your store.
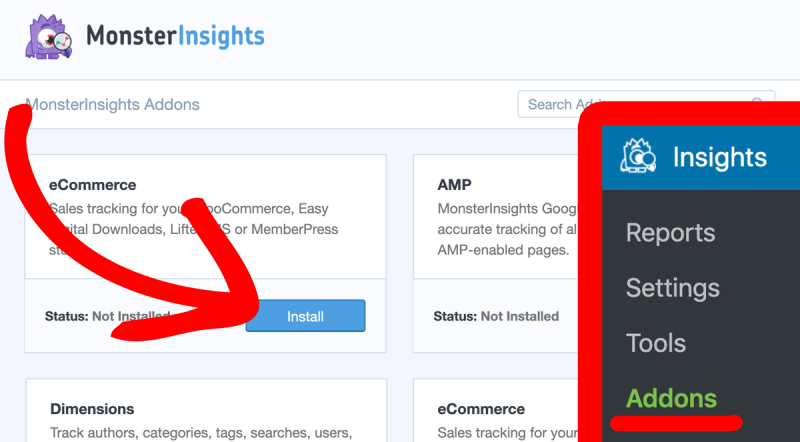
With both the MonsterInsights plugin and eCommerce addon installed on your site, and Google Analytics connected, it’s time to move on to the next step.
Step 2: Set Up Enhanced eCommerce Tracking in Google Analytics
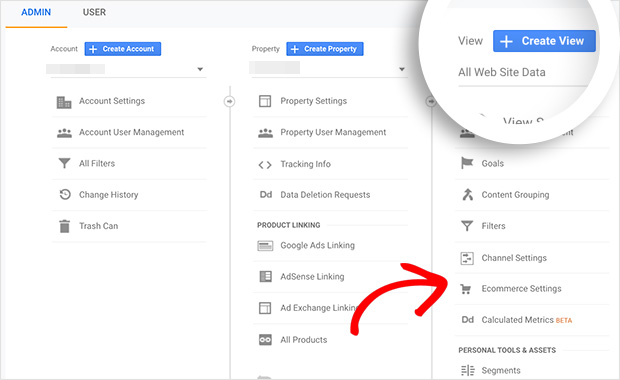
For the next step, log in to Google Analytics here. Then choose the website you’d like to set up eCommerce conversion tracking for.
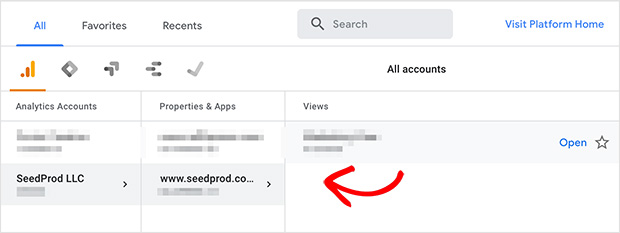
After that, click the Admin icon in the bottom left taskbar.
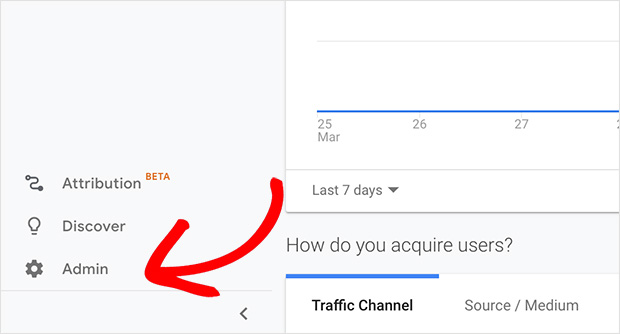
Now, look at the View column as shown below and click the eCommerce Settings heading.
You’ll then see a page titled eCommerce Setup. From there, toggle the Enable eCommerce slider until it’s in the ON position.

Then the Enable Enhanced eCommerce Reporting slider appears below. Go ahead and toggle that option to the ON position too.
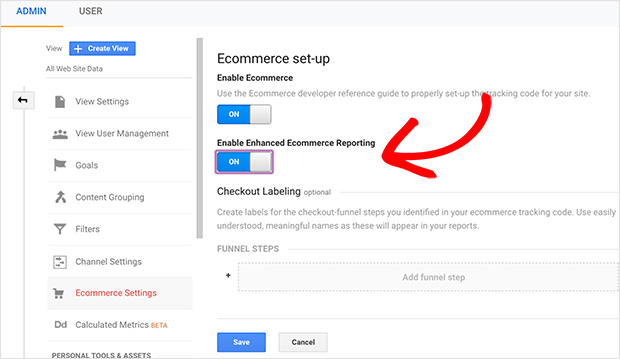
When you’ve finished, click the Save button.
With enhanced eCommerce tracking set up in Google Analytics, you can move on to setting it up in MonsterInsights.
Step 3: Enable Enhanced eCommerce in MonsterInsghts
For this step, log in to your WordPress dashboard and head to Insights » Settings.
From there, click the eCommerce tab and toggle the Use Enhanced eCommerce option.
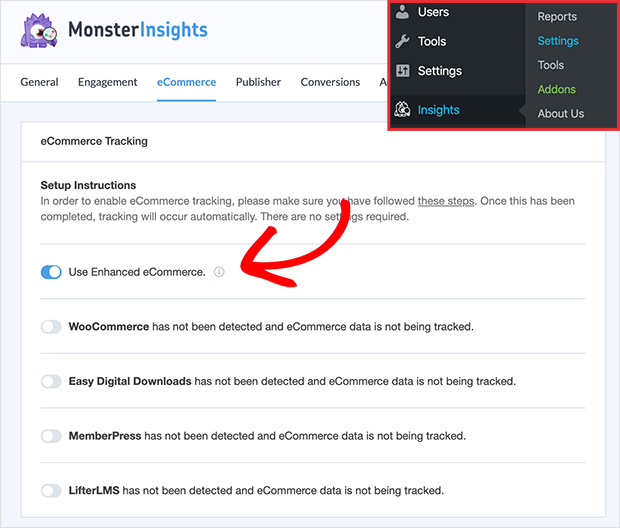
Simple as that! You’ve now enabled enhanced eCommerce in MonsterInsights.
But how do you view the data you’re tracking? Let’s find out.
Step 4: View Conversion Data Reports in WordPress
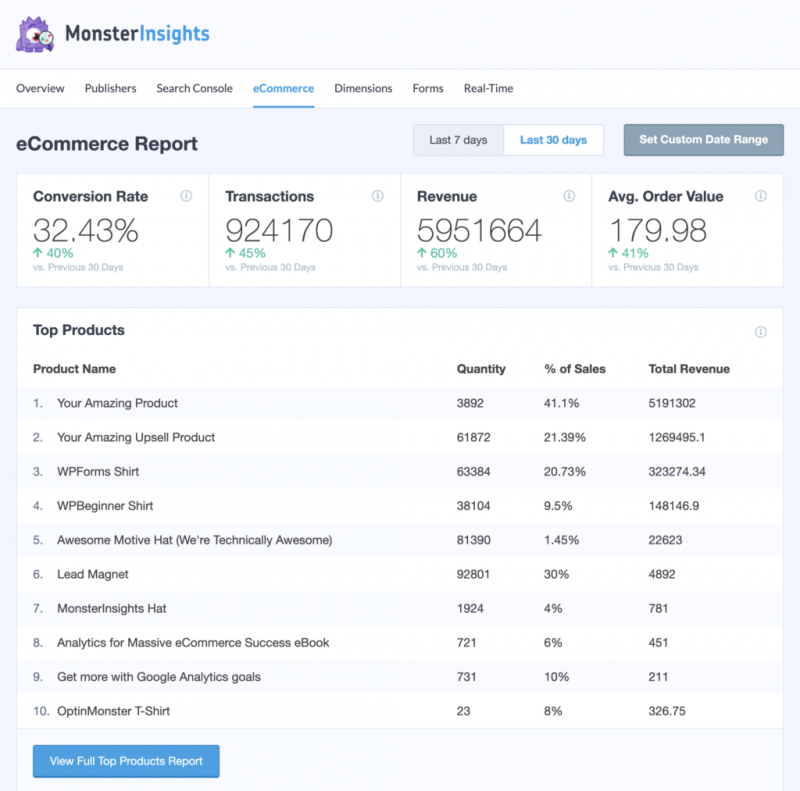
To view your store’s conversion tracking data in your WordPress dashboard, head to Insights » Reports » WooCommerce.
From there, you’ll see an overview of your top products with the sales percentage and total revenue.
Then if you scroll further down the page, you’ll see your top conversion event sources and your shopper behavior.
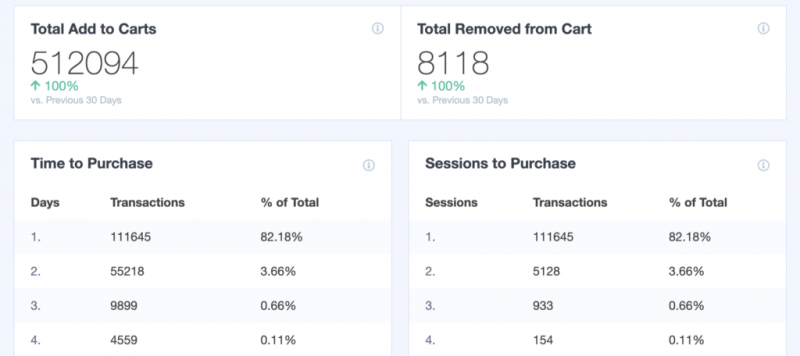
With MonsterInsight’s powerful reports, you have an excellent overview of your online store’s health without having to leave your WordPress dashboard.
But if you’d rather track conversions and see the data in Google Analytics, follow the next step.
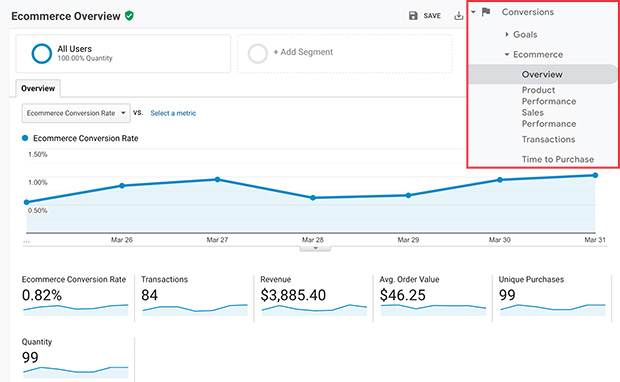
Step 5: View WooCommerce Conversion Tracking Data in Google Analytics
To find your conversion tracking data for WooCommerce in Google Analytics, all you need to do is go to your analytics profile and navigate to Conversions » eCommerce » Overview.
And there you have it!
You’ve learned how to set up WooCommerce conversion tracking for your online store.
If you’re looking to speed up your WooCommerce store, we’ve put a handy step-by-step guide together you can check out.
And if you liked this article, don’t forget to like us on Facebook and follow our Twitter account for more helpful WordPress guides.
The post How to Set Up WooCommerce Conversion Tracking for Your Store appeared first on SeedProd.