Are you looking for a simple way to create a contact form in WordPress?
It makes sense that as a site owner you’ll want people to be able to contact you in a simple and straightforward way. But it’s not always easy to decide on the best way to achieve this without confusing your visitors.
Don’t worry! In this article, we’re showing you how to create a contact form in WordPress. And we’re breaking it down step-by-step so that even beginners can do it.
Why you Should Create a Contact Form in WordPress
When you’re building your site, you might wonder if it’s better to just display your email address instead of building a contact form. Truth is contact forms offer far more than a simple email address can.
Let’s look at what a contact form can offer that an email address can’t:
- Information control – With contact forms you have control over the type of information that’s collected through your website by adding only the form fields you need your visitors to fill in. Doing so limits the number of emails you and your visits send back and forth to each other.
- Easy communication – Contact forms make it super-easy for site visitors to get in touch and communicate their ideas, comments, and questions.
- Message organization – Almost all contact forms include a subject line for people to write a brief overview of why they’re getting in touch. This helps you know who is sending you a message, why, and vice versa.
- Increased security – Contact forms don’t display your email address so spammers can’t send you unwanted messages.
Now you know that using a contact form instead of sharing your email address is a smart choice let’s look at how to create your first contact form.
Before we get started, here’s a quick run-down of the steps involved:
- Download the WPForms WordPress plugin.
- Create a simple contact form.
- Define the general settings of your form.
- Set the notification settings for your form.
- Configure your confirmation messages.
- Publish the contact form to your website.
Let’s get to it!
How to Create Your First Contact Form
For this guide, we’ll be using WPForms to build a contact form. WPForms is the most beginner-friendly contact form plugin on the market and is super easy set up right out-of-the-box.
There are both free and paid versions of WPForms available. While the free version has everything you need to get started, we’ll be using the paid version of WPForms because of the extended functionality you can take advantage of.
Here’s a look at extra features available when upgrading to the paid version:
- WPForms Pro lets you use the plugin on more than one website which is great if you have multiple websites to take care of.
- Build multiple form types including multi-page forms, payment forms, email subscription forms, and more.
- View your form submissions in your WordPress dashboard and receive email notifications of new messages.
- The surveys and polls addon offers a comprehensive survey solution and comes with real-time WordPress polls, star ratings, and Likert scales meaning you won’t need to take out extra subscriptions for costly survey platforms if you want to add a survey to your website.
- Create distraction-free form pages in WordPress using the WPForms form landing page solution.
- All forms integrate with popular email marketing services and payment platforms like Stripe and PayPal.
What’s more, WPForms is being used on over 3 million websites with a loyal following in the WordPress community. Take a look at the WPForms user reviews here.

Now let’s move on to the first step in creating a contact form in WordPress for beginners.
Step 1. Download the WPForms WordPress Plugin
The first step is to grab yourself a copy of WPForms, then download the plugin to your computer.
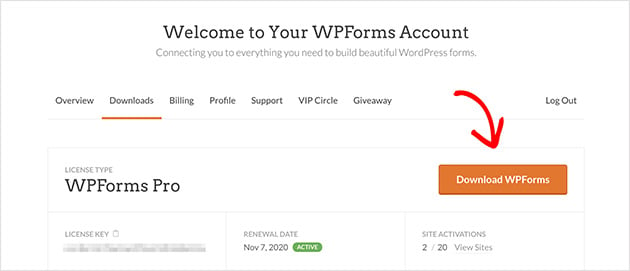
Once you’ve created your WPForms account, head to the WPForms login page to access your account dashboard and click View License Key, Details, and Downloads.

You’ll then be taken to the page that has your license key details and the link to download the plugin.
Click the Download WPForms button to download it to your computer then save your license key to a notepad for use later.
Now install and activate your plugin in WordPress. For instructions on how to install WordPress plugins see this handy guide for beginners.
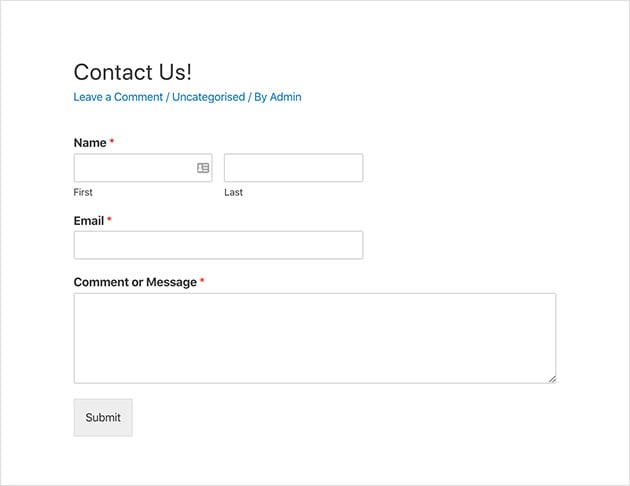
Step 2. Create a Simple Contact Form
With WPForms installed and activated on your site, it’s time to create your first contact form. To do this go to WPForms » Add New to create a new form.
On the following setup screen enter your form name and click the Simple Contact Form template.
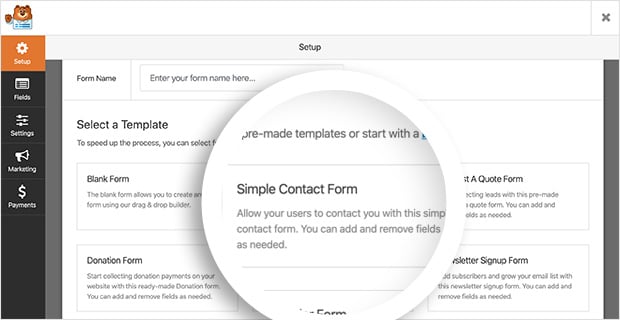
WPForms will automatically create a simple contact form for you.
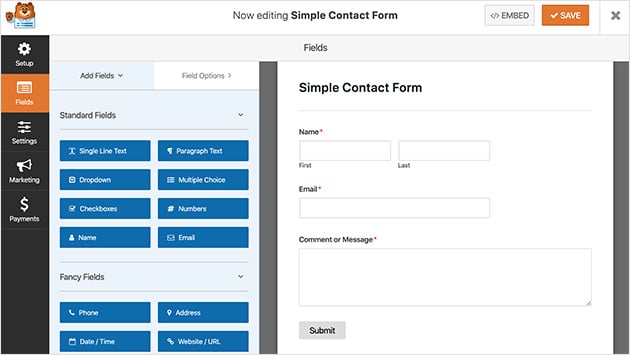
From here it’s easy to add extra fields to your contact form by dragging them from the left-hand panel to the right.
You can click on any of the fields to edit the label names, include a description, and more. You can even click and drag any of the fields to rearrange the order of your contact form.
When you’re happy with your customizations click Save.
Now we’ll move on to defining your forms’ general settings.
Step 3. Define the General Settings of Your Form
To define the general settings of your form go to Settings » General.

In this section you can define the following settings:
- Form Name – Rename your form if you’d like to call it something different.
- Form Description – Give your form name a description to help you remember what that form is for.
- Submit Button Text – Change the label for the submit button if you want.
- Spam Prevention – Prevent spam bots from submitting forms by enabling the anti-spam honeypot feature.
- GDPR Compliance – You can disable storing entry information in WordPress such as IP addresses and user agents to help you comply with GDPR.
When you’re happy with these settings click Save.
We’ll look at setting your form notifications next.
Step 4. Set the Notification Settings for Your Form
Setting notifications for your contact form is a good way to get notified whenever someone submits a form on your site. And it’s worth noting that if you don’t choose to disable this feature you’ll get a notification every time someone submits a form.
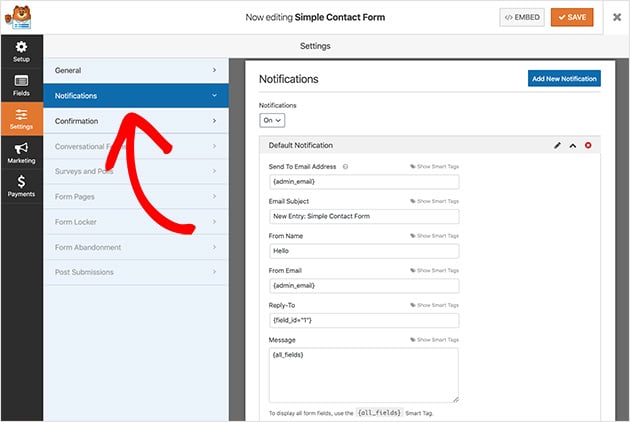
You can even use smart tags in WPForms to send your site visitors a notification when they complete a contact form. This lets them know that you’ve received their form and assures them their message has gone through correctly.
To learn more about setting up notifications in WordPress, please see the documentation.
With your notification settings sorted out, let’s look at configuring your confirmation messages.
Step 5. Configure Your Confirmation Messages
A confirmation message is a short note that’s displayed to your site visitors after they’ve submitted a contact form. They’re a way of letting them know that their message has been sent successfully and gives you a chance to tell them what their next steps should be.
In WPForms there are 3 different confirmation message types to choose from:
- Message – The message confirmation type is the default option allowing you to show a quick message letting visitors know their message was submitted.
- Show Page – The Show Page type takes visitors to a specific page on your website like a thank you page after they submit their form.
- Go to URL (Redirect) – This option can be used if you want to send visitors to a different website.
To set your confirmation message click on Settings » Confirmation. Then choose the type of confirmation you’d like. For this guide, we’ll select Message.

Now enter the message you’d like your visitors to see and click Save when you’re done.
The exciting part is next which is publishing your form on your website!
Step 6. Publish the Contact Form to Your Website
With your contact form created, it’s time to add it to WordPress.
By using WPForms you can add your form to almost anywhere on your website such as pages, blog posts, and even your sidebar.
The most common choice is to embed the contact form into a post or page, which we’ll explain how to do now.
First, create a new blog post or page and click the plus icon to add a new WordPress block.
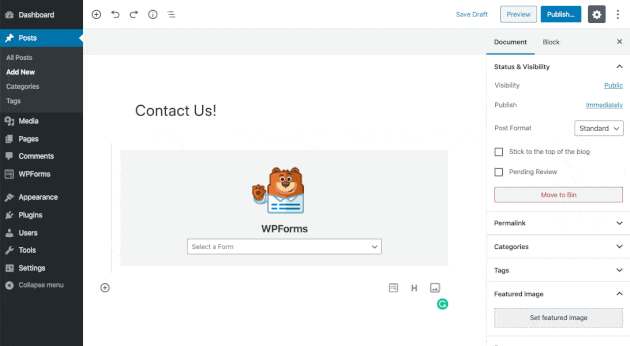
Then type WPForms into the block search bar, and the WPForms block will appear. Click it to add it to your post.
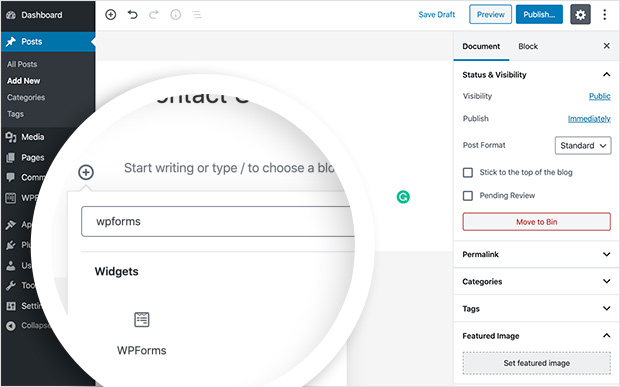
Next, choose your contact form from the dropdown list provided and your form will be added into your post.
Now all you need to do is publish your post or page for the form to appear live on your website.
Congratulations!
You’ve now successfully created a contact form in WordPress so your visitors can contact you with ease and you’ll never miss a message. Wasn’t it easy?
Looking for some more great ways to extend the functionality of your website? Our definitive guide to the best WordPress plugins is sure to have some ideas for you.
We hope you found this article helpful. If you did, do follow us on Twitter and Facebook for more content like this.
The post How to Create a Contact Form in WordPress (Beginners Guide) appeared first on SeedProd.